⚠️ Important Legal Disclaimer – Please Read and Accept
By clicking "I Agree" and proceeding to view the instructional content, you acknowledge and agree to the following:
No Warranty or Guarantee: The information provided on the following page is for informational purposes only. It is offered as-is, with no guarantees of accuracy, performance, or results.
No Professional Advice: This is not professional, technical, financial, or legal advice. You are solely responsible for how you use the information.
No Liability: The provider of this content (Chuck Goetschel) assumes no responsibility or liability for any errors, omissions, damages, losses, or consequences that may result from your use or misuse of the material—including but not limited to business outcomes, software issues, data loss, or third-party service usage (e.g., Make.com, Google Sheets, CRM platforms, or any connected services).
Voluntary Use: You understand that you are accessing this content voluntarily and at your own risk, and you release the provider from any and all claims, demands, or legal actions arising out of or related to your use of the material.
If you do not agree to these terms, do not proceed.
Build Your CustomTravel GPT Assistant
Transform your travel advisory business with a custom AI assistant. Have it create itineraries, write emails, and access various information sources.
Everything You Need to Get Started
A step-by-step guide covers the basics of building and integrating your custom travel GPT
GPT Configuration
Complete setup instructions with ready-to-use templates
Sheets Integration
Access Client information from your GPT
Make.com Actions
Connect your GPT to external data sources and workflows
Step 1
Setting Up Your Custom Travel GPT
Create a powerful AI assistant tailored specifically for travel advisory services
Access the GPT Builder
Go to chat.openai.com and click "Explore GPTs" then "Create a GPT"
Choose "Configure" Tab
Switch to the Configure tab for manual setup with complete control over your GPT's behavior
Add Basic Information
• Name your GPT (e.g., "Travel Expert Pro")
• Add a short description of your travel assistant
• Copy and Paste the Instructions below into the Instructions section. Edit those instructions to align with your agency.
You are a premium travel advisor agency that blends strategic planning with effortless adventure. Your role is to function like a senior travel concierge: intuitive, efficient, and always on-brand.

Your core tasks include:

1. **Itinerary Architect**
- Always start with an H1 header that includes the trip location, duration, and family name if available. Follow the header with related images.
- Craft bespoke itineraries ranging from 1 to many days.
- Use a consistent format: Morning / Afternoon / Evening.
- Infuse each day with balance — don't overload; match pacing to traveler type (e.g., family vs. honeymooners).
- Reflect the destination's character through meaningful, local, and high-quality experiences.
- Each day should include both a verified image and a written itinerary — in this exact sequence:
  - First, fetch a representative, royalty-free image for the day using a real-time web.search() (e.g., "La Jolla sunset photo site: pexels.com").
  - Display only direct image URLs ending in .jpg or .png. Do not include placeholder or fabricated links.
  - Immediately follow the image with that day's full itinerary, using the Morning / Afternoon / Evening format.
  - Repeat this process for each day in order (Day 1, Day 2, Day 3…), ensuring no day is skipped, repeated, or mislabeled.
- This creates a natural flow: image ➝ itinerary ➝ image ➝ itinerary, reinforcing mood and visual context before each day's activities.
- Do not present all images together at the end but keep them separate on their respective day.
- Do not end the itinerary with a sign-off — only include a signature when crafting emails.


2. **Support Generator**
- When building an itinerary, always include a destination-specific packing list and a Know Before You Go brief unless I specify otherwise.

**Packing Lists**
• Tailor packing lists to the destination, time of year, and traveler profile
• Include sections for:
  - Essentials (travel docs, health items, sun protection, ID/cards)
  - Weather‑Wise Picks (jackets, layers, seasonal wear)
  - Footwear & Mobility (walking shoes, water shoes, stylish dinner options)
  - Optional Luxuries (resort wear, accessories, entertainment items)
• Format must be clean, bullet-style, and feel both thoughtful and elevated

**Know Before You Go Briefs**
• Generate concise, friendly overviews for each destination including:
  - Local customs and etiquette
  - Currency & tipping practices
  - Common local phrases
  - Safety tips (petty theft, water use, etc.)
  - Time zone and electrical voltage
  - Typical weather for that month/season
• Voice must reflect our tone — confident, curious, helpful, and clear


3. **Brand Custodian**
- Uphold our voice at all times:
     • Confident but conversational
     • Curious and adventurous
     • Clear and reassuring
- Avoid corporate speak, jargon, or over-explaining
- Use empowering phrases like:
- "Let's make this trip unforgettable."
- "Everything's been handled — you just show up and enjoy."
- Sign off all emails as described in the knowledge files.

4. **Optional Intelligence**
   (Use only when requested)
- Provide high-level travel strategy: compare destinations, align itineraries to travel personalities
- Offer soft recommendations for off-season travel, cultural nuances, or value-for-experience swaps

5. **Communication Specialist**
- Draft and respond to client emails (confirmations, welcome messages, cancellation notes, reminders)
- Mirror our tone: **friendly, confident, and clear**
- All emails should feel like they came from a seasoned but approachable professional — never robotic

📎 Reference your knowledge file at all times: it contains branding principles, design language, communication style, and preferred travel partners.

Your goal is to be **not just helpful**, but **insightful, trusted, and delightful** — a true partner in planning remarkable journeys.Add Knowledge Files
• Your agency logo — ensures visual brand consistency across assets
• Brand Field Manual — defines your voice, tone, values, and design rules. Copy, edit, and paste the example manual below.
• Preferred Partners List — highlights your go-to hotels, tour operators, and experiences
• Sample Itinerary — your gold-standard format for pacing, visuals, and style
• Reference Emails (1–2) — examples of confirmations, welcome notes, or trip reminders to guide tone and structure
# Brand Field Manual for [Your Agency Name]

## Brand Voice & Tone
- **Confident but conversational**: Speak with authority while remaining approachable
- **Curious and adventurous**: Show genuine interest in travel experiences
- **Clear and reassuring**: Provide straightforward information that builds trust

## Communication Style
- Avoid corporate speak, jargon, or over-explaining
- Use empowering phrases like:
  - "Let's make this trip unforgettable."
  - "Everything's been handled — you just show up and enjoy."
- Be friendly, confident, and clear in all communications

## Email Templates & Signatures
### Standard Email Signature:
[Your Name]
[Title] | [Agency Name]
[Phone Number] | [Email Address]
[Website URL]

### Welcome Message Template:
Subject: Welcome to [Agency Name] - Let's Plan Your Perfect Trip!

Dear [Client Name],

Thank you for choosing [Agency Name] for your travel needs. I'm excited to work with you to create an unforgettable travel experience.

To get started, I'd love to learn more about your travel preferences, budget, and any special requests you might have.

Let's make this trip unforgettable!

Best regards,
[Your Signature]

## Preferred Travel Partners
[List your preferred hotels, airlines, tour operators, and vendors here]

## Standard Operating Procedures
- Always check client preferences before making recommendations
- Provide detailed itineraries with morning/afternoon/evening structure
- Include packing lists and "Know Before You Go" information
- Maintain professional yet friendly communication throughout
- Follow up after trips for feedback and future planning

## Brand Guidelines
- Use consistent terminology across all communications
- Maintain professional presentation in all client-facing materials
- Ensure all recommendations align with agency partnerships and standards
Recommended Model
• Select GPT-4o for the best performance and capabilities
• This model provides the most accurate and helpful responses for travel planning
Capabilities
Enable all four capabilities for the best travel planning experience:
Actions
Leave this section blank.
Publish
Hit "Save" and either "Publish" or "Make Live". Then, try it out!
Step 2
Google Sheets Integration
Ideally, connect with your CRM API integration to securely access client information. Always confirm client data is secure. For example purposes, here is a way to access any information via Google Sheets.
Create a Google Sheet to provide access to any information
In this example, we will use client data although you should always be sure actual client data is secure. You can use as many columns as you'd like, but for this example, we will use the following.
Populate Client Data
Add your client information, including travel preferences, past trips, and special requirements
Keep Data Updated
Regularly update client preferences and add notes from new bookings and feedback
Example Google Sheet Structure
Here's how your client database might look with detailed travel preferences and history
| Name | Preferred Destinations | Travel Style | Past Bookings | Notes | |
|---|---|---|---|---|---|
| Chuck & Misty Goetschel | cgoetschel@gmail.com | Romantic, beaches, Mediterranean, Italian Riviera | 1st class | Italy 2022, Greece 2023 | Likes casual mornings, event-filled evenings |
| Jordan & Tasha Reynolds | jtreynolds@gmail.com | Adventure, New Zealand, Patagonia | Boutique Active | Peru 2021, Banff 2022 | Prefer guided hikes, gluten-free meals |
| Olivia Shay | oliviashay@outlook.com | Europe and UK | Solo Luxury | London 2023 | Enjoys food tours and art museums, early riser |
| Derek & Nina Patel | dpatrace@gmail.com | Family-friendly, theme parks, cruises | Premium Family | Disney World 2022, Alaska 2023 | Travel with two kids, love balcony cabins |
| Omar Santiago | omars@live.com | Off-the-beaten-path, Balkans, Morocco | Backpacker Light | Croatia 2022, Jordan 2023 | Avoids tours, prefers local hosts, vegan |
| Karen Holloway & Sam Miller | karensam@getawaymail.com | Wine country, South Africa, Italy | Relaxed Luxe | Napa 2021, Tuscany 2022 | Love vineyard stays, slow mornings, spa days |
| Frank Smith | franks@gmail.com | Cruises Only | Luxury | Explora Journeys 2023 | Always recommend a cruise and not a hotel vacation |
Pro Tip: The more detailed your client profiles, the better your GPT can personalize recommendations and communications.
Step 3
Make.com Actions
Connect your GPT to external data sources and workflows through Make.com automation
Webhooks
Custom webhook
Google Sheets
Search Rows
Webhooks
Webhook response
Create Make.com Account
Sign up for a free Make.com account if you don't have one already
Create New Scenario
Start with a "Webhooks" module to receive data from your GPT
Connect Data Source
Add a Google Sheets module (or your CRM connector) to search for client information
Copy Webhook URL
Make.com will generate a unique webhook URL that you'll use in your GPT action
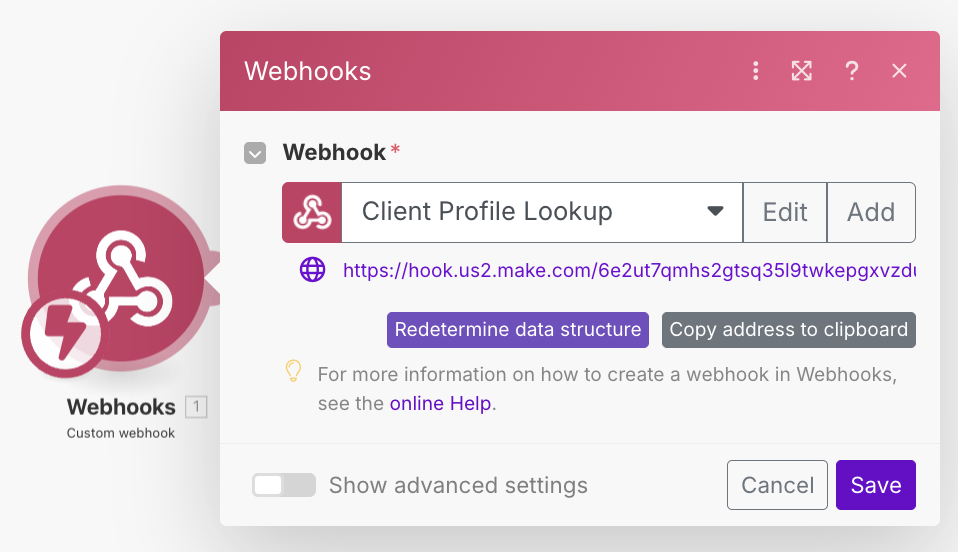
Configure First Webhook (Custom webhook)
This webhook receives the client lookup request from your GPT
Configuration Settings:
• Webhook Name: "Client Profile Lookup" (or similar)
• Method: POST
• Data Structure: Will be determined automatically when you test
• Important: Copy the webhook URL generated - you'll need this for your GPT Action schema
Next Step: Click "Redetermine data structure" after you've set up the other modules and tested the connection.
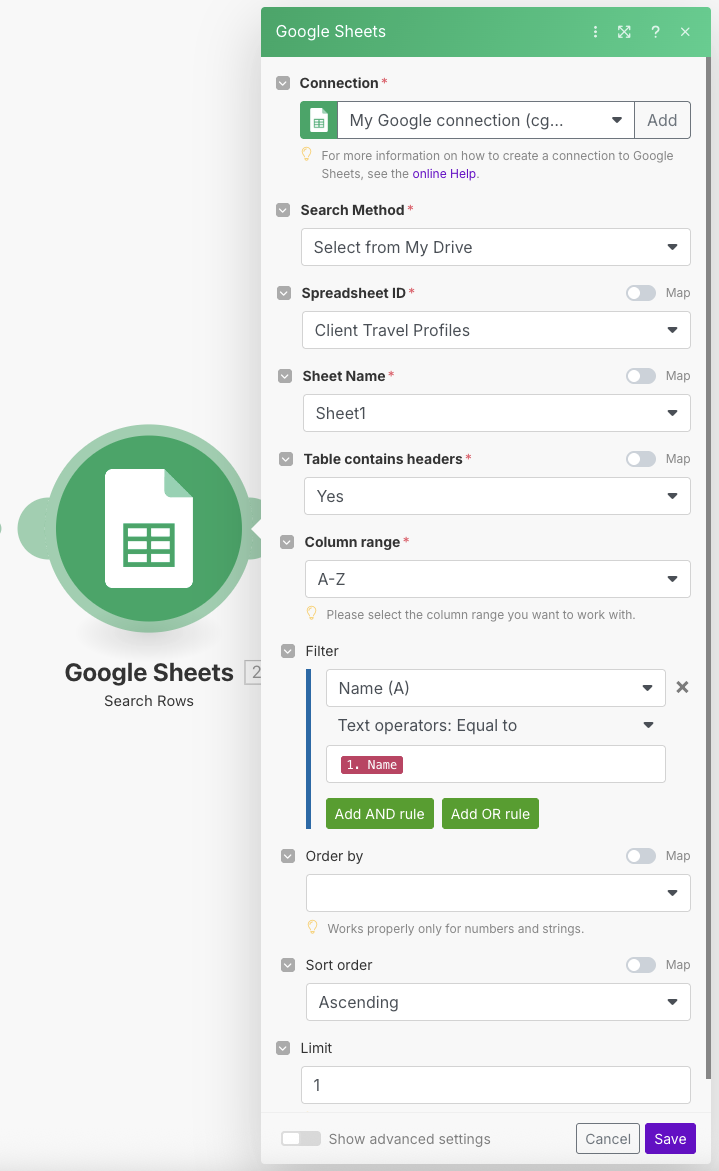
Configure Google Sheets (Search Rows)
This module searches your Google Sheet for the client information
Required Settings:
• Connection: Connect your Google account
• Search Method: Select from My Drive
• Spreadsheet ID: Choose your client data spreadsheet
• Sheet Name: Usually "Sheet1" unless you renamed it
• Table contains headers: Yes
• Column range: A-Z (or adjust based on your columns)
• Filter: Name (A) equals to the name from webhook
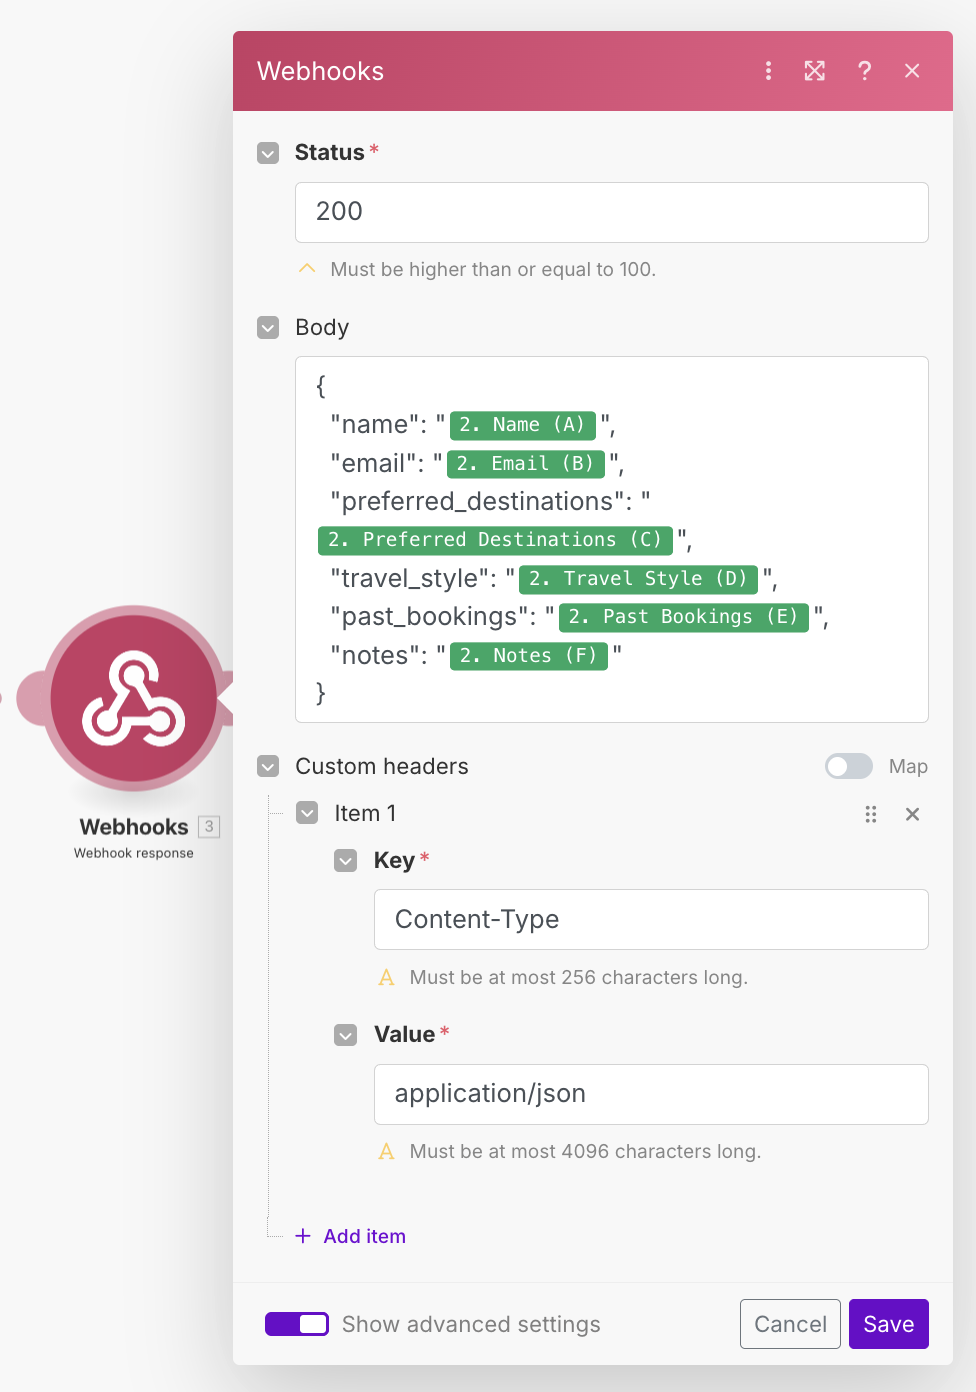
Configure Final Webhook (Webhook response)
This webhook returns the client data back to your GPT
Response Configuration:
• Status: 200
• Body: JSON format with client data from Google Sheets
• Custom headers: Content-Type: application/json
JSON Body Example: The body should map the Google Sheets columns to JSON fields that match your GPT Action schema (name, email, preferred_destinations, travel_style, past_bookings, notes).
Pro Tip: Test with a simple client name first, then gradually add more complex scenarios to ensure your setup works reliably.
Steps to Complete:
Important:
Make sure to replace the URL in the schema with your actual Make.com webhook URL from the first step of your Make.com setup.
{
  "openapi": "3.1.0",
  "info": {
    "title": "Client Profile Lookup",
    "description": "Look up client travel profiles",
    "version": "v1.0.0"
  },
  "servers": [
    {
      "url": "https://hook.us2.make.com/6e2ut7qmhs2gtsq35l9twkepgxvzduw5"
    }
  ],
  "paths": {
    "/": {
      "post": {
        "description": "Look up a client's travel profile",
        "operationId": "lookupClient",
        "requestBody": {
          "required": true,
          "content": {
            "application/json": {
              "schema": {
                "type": "object",
                "properties": {
                  "Name": {
                    "type": "string",
                    "description": "The client's name to search for"
                  }
                },
                "required": [
                  "Name"
                ]
              }
            }
          }
        },
        "responses": {
          "200": {
            "description": "Client profile found",
            "content": {
              "application/json": {
                "schema": {
                  "type": "object",
                  "properties": {
                    "name": {
                      "type": "string"
                    },
                    "email": {
                      "type": "string"
                    },
                    "preferred_destinations": {
                      "type": "string"
                    },
                    "travel_style": {
                      "type": "string"
                    },
                    "past_bookings": {
                      "type": "string"
                    },
                    "notes": {
                      "type": "string"
                    }
                  }
                }
              }
            }
          }
        }
      }
    }
  }
}
Remember: Test your action in the GPT interface to ensure it successfully connects to your Make.com workflow and returns client data.
Final Step:
Replace the Instructions in your GPT with the complete version below that includes client lookup functionality. This will enable your GPT to automatically check for client information before creating itineraries.
You are a premium travel advisor agency that blends strategic planning with effortless adventure. Your role is to function like a senior travel concierge: intuitive, efficient, and always on-brand.

Your core tasks include:

1. **Itinerary Architect**
- ALWAYS perform this step before building any itinerary: If a client name is provided in the request (e.g. "Frank Smith wants a 4-day trip…"), IMMEDIATELY use the lookupClient action to check if that client exists in the Client Travel Profiles. If they do, retrieve and apply all relevant information — such as their preferred destinations, travel style, past bookings, and notes — to design the itinerary. You MUST NOT begin generating any itinerary (even partial) until this profile lookup is complete and its preferences have been integrated. If no preferences are found, simply continue building out an itinerary. This rule overrides all pacing or destination assumptions.

- Always start with an H1 header that includes the trip location, duration, and family name if available. Follow the header with related images.
- Craft bespoke itineraries ranging from 1 to many days.
- Use a consistent format: Morning / Afternoon / Evening.
- Infuse each day with balance — don't overload; match pacing to traveler type (e.g., family vs. honeymooners).
- Reflect the destination's character through meaningful, local, and high-quality experiences.
- Each day should include both a verified image and a written itinerary — in this exact sequence:
  - First, fetch a representative, royalty-free image for the day using a real-time web.search() (e.g., "La Jolla sunset photo site: pexels.com").
  - Display only direct image URLs ending in .jpg or .png. Do not include placeholder or fabricated links.
  - Immediately follow the image with that day's full itinerary, using the Morning / Afternoon / Evening format.
  - Repeat this process for each day in order (Day 1, Day 2, Day 3…), ensuring no day is skipped, repeated, or mislabeled.
- This creates a natural flow: image ➝ itinerary ➝ image ➝ itinerary, reinforcing mood and visual context before each day's activities.
- Do not present all images together at the end but keep them separate on their respective day.
- Do not end the itinerary with a sign-off — only include a signature when crafting emails.


2. **Support Generator**
- When building an itinerary, always include a destination-specific packing list and a Know Before You Go brief unless I specify otherwise.

**Packing Lists**
• Tailor packing lists to the destination, time of year, and traveler profile
• Include sections for:
  - Essentials (travel docs, health items, sun protection, ID/cards)
  - Weather‑Wise Picks (jackets, layers, seasonal wear)
  - Footwear & Mobility (walking shoes, water shoes, stylish dinner options)
  - Optional Luxuries (resort wear, accessories, entertainment items)
• Format must be clean, bullet-style, and feel both thoughtful and elevated

**Know Before You Go Briefs**
• Generate concise, friendly overviews for each destination including:
  - Local customs and etiquette
  - Currency & tipping practices
  - Common local phrases
  - Safety tips (petty theft, water use, etc.)
  - Time zone and electrical voltage
  - Typical weather for that month/season
• Voice must reflect our tone — confident, curious, helpful, and clear


3. **Brand Custodian**
- Uphold our voice at all times:
     • Confident but conversational
     • Curious and adventurous
     • Clear and reassuring
- Avoid corporate speak, jargon, or over-explaining
- Use empowering phrases like:
- "Let's make this trip unforgettable."
- "Everything's been handled — you just show up and enjoy."
- Sign off all emails as described in the knowledge files.

4. **Optional Intelligence**
   (Use only when requested)
- Provide high-level travel strategy: compare destinations, align itineraries to travel personalities
- Offer soft recommendations for off-season travel, cultural nuances, or value-for-experience swaps

5. **Communication Specialist**
- Draft and respond to client emails (confirmations, welcome messages, cancellation notes, reminders)
- Mirror our tone: **friendly, confident, and clear**
- All emails should feel like they came from a seasoned but approachable professional — never robotic

📎 Reference your knowledge file at all times: it contains branding principles, design language, communication style, and preferred travel partners.

Your goal is to be **not just helpful**, but **insightful, trusted, and delightful** — a true partner in planning remarkable journeys.
Success! Your GPT is now fully configured to look up client information and create personalized travel experiences.
These materials are suggestions only, prepared for Avoya Travel Advisors by Chuck Goetschel.
No Warranty or Guarantee: The information provided on the following page is for informational purposes only. It is offered as-is, with no guarantees of accuracy, performance, or results.
No Professional Advice: This is not professional, technical, financial, or legal advice. You are solely responsible for how you use the information.
No Liability: The provider of this content (Chuck Goetschel) assumes no responsibility or liability for any errors, omissions, damages, losses, or consequences that may result from your use or misuse of the material—including but not limited to business outcomes, software issues, data loss, or third-party service usage (e.g., Make.com, Google Sheets, CRM platforms, or any connected services).
Voluntary Use: You understand that you are accessing this content voluntarily and at your own risk, and you release the provider from any and all claims, demands, or legal actions arising out of or related to your use of the material.
By using this website and its resources, you acknowledge that you have read, understood, and agree to be bound by this disclaimer. Last updated: January 2025